Getting Started With Docker
Getting Started With Docker
Virtualization softwares have been in the market since ages. But there has always been a race to create more efficient and high performance platforms among the developers. Few years ago, this lead in the development of yet another virtualization platform — Docker.
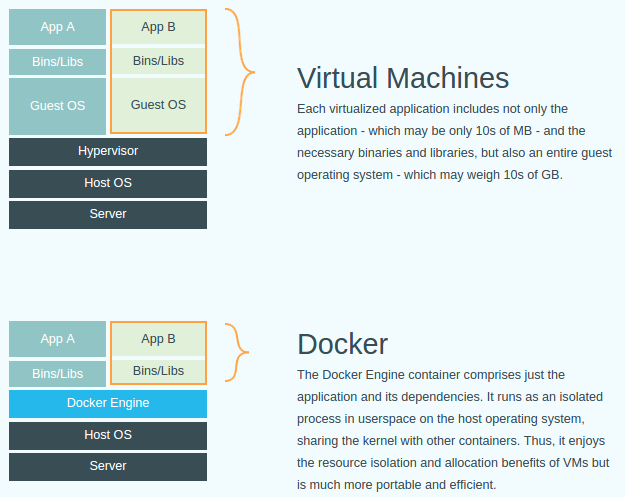
Docker is a wee bit different than the traditional virtualization platforms. Docker is a “Software Container” platform. This means that unlike VM’s Docker does not bundle the entire Operating System; rather than that it only bundles libraries and settings in its containers.

Now what is the advantage of this? This is basically helpful in addressing the age old problem of “the code works on my machine”. Development and deployment on Docker ensures that the Developers, Testers, System Admin, and anyone else using the codes have the same dependencies installed upto the depth of build level.
This article primarily deals with basic Docker commands to get you started. There are a bunch of articles already available to install docker on your system.
Docker Image Management
Creating an image requires a file — known as Dockerfile, which has the instructions to create an image. A Dockerfile which has a set of instructions; but we will have a look at it in another article. Once you have a Dockerfile downloaded, you can build an image from it using the following command
$ docker build -t <tag_name> /path/to/dockerfile
UPDATE: Here is the article on getting started with Dockerfile – https://www.codincafe.com/2017/07/14/writing-first-dockerfile/
The -t switch in the build command allows you to give it a tag name which you use to refer to the image.
Optionally there is a repository known as Docker Hub from where you can pull a Dockerfile and create an image out of it. Use the following command to create an image from Docker Hub
$ docker pull <author/repo-name>
The following command will allow you to view all the images available
$ docker images

REPOSITORY           TAG                 IMAGE ID            CREATED             SIZE

dougbtv/asterisk14   latest              cf39a1177ae4        2 months ago        1.23 GB

yumweb/hello-world   latest              f24a4427e3a7        5 months ago        438 MB
The following image can be used to remove an image
$ docker rmi <image>
Docker Container Management
In this section will look at Docker container command.
Run container
To run a docker container from an image use
$ docker run -tid --name=<container_name> <image>
The switches after run are:
-t : Allocate a pseudo-TTY
-i : Keep STDIN open even if not attached
-d : Run container in background and print container ID
Run container with port mapping
$ docker run -tid -p 127.0.0.1:80:8080 —name=<container_name> <image>
This binds port 8080 of the container to port 80 on 127.0.0.1 of the host machine.
View all running containers
$ docker ps

CONTAINER ID        IMAGE               COMMAND             CREATED             STATUS              PORTS                       NAMES

68ce646da49a        f24a4427e3a7        "node server"       5 hours ago         Up 14 seconds       80/tcp, 443/tcp, 4567/tcp   test
Start a running but stopped container
$ docker start <container_name>
Stop a container
$ docker stop <container_name>
Restart container
$ docker restart <container_name>
Remove container
$ docker rm <container_name>
Connect to bash in container
$ docker exec -it <container_nam> /bin/bash
The container bash can be accessed only if the docker has been started with the -t switch
Bonus Commands
Here are some bonus commands to make your lives easy.
Stop all containers
$ docker stop $(docker ps -a -q)
Remove all containers
$ docker rm $(docker ps -a -q)
Stop and remove all containers
$ docker rm -f $(docker ps -a -q)
Remove all ‘exited’ Docker containers
$ docker rm $(docker ps -qa --no-trunc --filter "status=exited")
Remove all images
$ docker rmi $(docker images -q)
Remove all Untagged Docker images
$ docker rmi $(docker images -a | grep "^" | awk '{print $3}')
